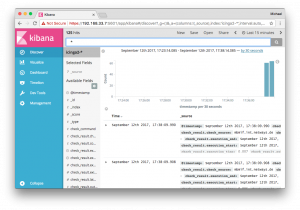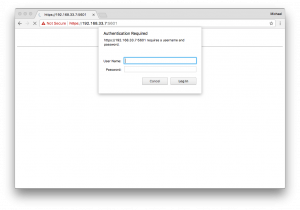
We’re also concerned about security, and have been looking into security mechanisms such as basic auth or TLS. Unfortunately this isn’t included in the Open Source stack.
Why should you care about securing Elasticsearch and Kibana?
Modern infrastructure deployments commonly require Elasticsearch listening on an external interface and answering HTTP requests. Earlier this year we’ve learned about ransomware attacks on MongoDB and Elasticsearch too.
During development I’ve found this API call – just clear everything inside the database.
[root@icinga2-elastic ~]# curl -X DELETE http://localhost:9200/_all
{"acknowledged":true}
I don’t want any user to run this command from anywhere. You can disable this by setting „action.destructive_requires_name“ to „true“ inside the configuration, but it is not the default.
A similar thing is that you can read and write anything without any access rules in place, no matter if querying Elasticsearch or Kibana directly.
Firewall and Network Segments
A possible solution is to limit the network transport to only allowed hosts via firewall rules and so on. If your Elasticsearch cluster is running on a dedicated VLAN, you would need to allow the Icinga 2 monitoring host to write data into – anyone on that machine could still read/write without any security mechanism in place.
HTTP Proxy with Nginx
Start with the plain proxy pass configuration and forward http://localhosT:9200 to your external interface (192.168.33.7 in this example).
# MANAGED BY PUPPET
server {
  listen       192.168.33.7:9200;
  server_name  elasticsearch.vagrant-demo.icinga.com;
  index  index.html index.htm index.php;
  access_log            /var/log/nginx/ssl-elasticsearch.vagrant-demo.icinga.com.access.log combined;
  error_log             /var/log/nginx/ssl-elasticsearch.vagrant-demo.icinga.com.error.log;
  location / {
    proxy_pass            http://localhost:9200;
    proxy_read_timeout    90;
    proxy_connect_timeout 90;
    proxy_set_header      Host $host;
    proxy_set_header      X-Real-IP $remote_addr;
    proxy_set_header      X-Forwarded-For $proxy_add_x_forwarded_for;
    proxy_set_header      Proxy "";
  }
}
Restart Nginx and test the connection from the external interface.
# systemctl restart nginx
# curl -v http://192.168.33.7:9200
Once this is working, proceed with adding basic auth and TLS.
HTTP Proxy with Basic Auth
This leverages the access level to authenticated users only. Best is to manage the basic auth users file with Puppet, Ansible, etc. – similar to how you manage your Nginx configuration. Our consultants use that method on a regular basis, and provided me with some examples for Nginx. You could do the same for Apache – I would guess that is a matter of taste and performance here.
Generate a username/password combination e.g. using the htpasswd CLI command.
htpasswd -c /etc/nginx/elasticsearch.passwd icinga
Specify the basic auth message and the file which contains the basic auth users.
    auth_basic                "Elasticsearch auth";
    auth_basic_user_file      "/etc/nginx/elasticsearch.passwd";
Restart Nginx and connect to the external interface.
# systemctl restart nginx
# curl -v -u icinga:icinga http://192.168.33.7:9200
HTTP Proxy with TLS
The Elasticsearch HTTP API does not support TLS out-of-the-box. You need to enforce HTTPS via HTTP Proxy, enable ssl and set up the required certificates.
Enforce the listen address to SSL only. That way http won’t work.
listen 192.168.33.7:9200 ssl;
Enable SSL, specify the certificate paths on disk, use TLSv1 and above and optionally secure the used ciphers.
  ssl on;
  ssl_certificate           /etc/nginx/certs/icinga2-elastic.crt;
  ssl_certificate_key       /etc/nginx/certs/icinga2-elastic.key;
  ssl_session_cache         shared:SSL:10m;
  ssl_session_timeout       5m;
  ssl_protocols             TLSv1 TLSv1.1 TLSv1.2;
  ssl_ciphers               ECDHE-ECDSA-CHACHA20-POLY1305:ECDHE-RSA-CHACHA20-POLY1305:ECDHE-ECDSA-AES128-GCM-SHA256:ECDHE-RSA-AES128-GCM-SHA256:ECDHE-ECDSA-AES256-GCM-SHA384:ECDHE-RSA-AES256-GCM-SHA384:DHE-RSA-AES128-GCM-SHA256:DHE-RSA-AES256-GCM-SHA384:ECDHE-ECDSA-AES128-SHA256:ECDHE-RSA-AES128-SHA256:ECDHE-ECDSA-AES128-SHA:ECDHE-RSA-AES256-SHA384:ECDHE-RSA-AES128-SHA:ECDHE-ECDSA-AES256-SHA384:ECDHE-ECDSA-AES256-SHA:ECDHE-RSA-AES256-SHA:DHE-RSA-AES128-SHA256:DHE-RSA-AES128-SHA:DHE-RSA-AES256-SHA256:DHE-RSA-AES256-SHA:ECDHE-ECDSA-DES-CBC3-SHA:ECDHE-RSA-DES-CBC3-SHA:EDH-RSA-DES-CBC3-SHA:AES128-GCM-SHA256:AES256-GCM-SHA384:AES128-SHA256:AES256-SHA256:AES128-SHA:AES256-SHA:DES-CBC3-SHA:!DSS;
  ssl_prefer_server_ciphers on;
  ssl_trusted_certificate   /etc/nginx/certs/ca.crt;
Restart Nginx and connect to the external interface on https. Note: Host verification is disabled in this example.
# systemctl restart nginx
# curl -v -k -u icinga:icinga https://192.168.33.7:9200
Combine HTTP Proxy, TLS and Basic Auth
A complete configuration example could look like this:
vim /etc/nginx/sites-enabled/elasticsearch.vagrant-demo.icinga.com.conf
# MANAGED BY PUPPET
server {
  listen       192.168.33.7:9200 ssl;
  server_name  elasticsearch.vagrant-demo.icinga.com;
  ssl on;
  ssl_certificate           /etc/nginx/certs/icinga2-elastic.crt;
  ssl_certificate_key       /etc/nginx/certs/icinga2-elastic.key;
  ssl_session_cache         shared:SSL:10m;
  ssl_session_timeout       5m;
  ssl_protocols             TLSv1 TLSv1.1 TLSv1.2;
  ssl_ciphers               ECDHE-ECDSA-CHACHA20-POLY1305:ECDHE-RSA-CHACHA20-POLY1305:ECDHE-ECDSA-AES128-GCM-SHA256:ECDHE-RSA-AES128-GCM-SHA256:ECDHE-ECDSA-AES256-GCM-SHA384:ECDHE-RSA-AES256-GCM-SHA384:DHE-RSA-AES128-GCM-SHA256:DHE-RSA-AES256-GCM-SHA384:ECDHE-ECDSA-AES128-SHA256:ECDHE-RSA-AES128-SHA256:ECDHE-ECDSA-AES128-SHA:ECDHE-RSA-AES256-SHA384:ECDHE-RSA-AES128-SHA:ECDHE-ECDSA-AES256-SHA384:ECDHE-ECDSA-AES256-SHA:ECDHE-RSA-AES256-SHA:DHE-RSA-AES128-SHA256:DHE-RSA-AES128-SHA:DHE-RSA-AES256-SHA256:DHE-RSA-AES256-SHA:ECDHE-ECDSA-DES-CBC3-SHA:ECDHE-RSA-DES-CBC3-SHA:EDH-RSA-DES-CBC3-SHA:AES128-GCM-SHA256:AES256-GCM-SHA384:AES128-SHA256:AES256-SHA256:AES128-SHA:AES256-SHA:DES-CBC3-SHA:!DSS;
  ssl_prefer_server_ciphers on;
  ssl_trusted_certificate   /etc/nginx/certs/ca.crt;
  uth_basic                "Elasticsearch auth";
  auth_basic_user_file      "/etc/nginx/elasticsearch.passwd";
  index  index.html index.htm index.php;
  access_log            /var/log/nginx/ssl-elasticsearch.vagrant-demo.icinga.com.access.log combined;
  error_log             /var/log/nginx/ssl-elasticsearch.vagrant-demo.icinga.com.error.log;
  location / {
    proxy_pass            http://localhost:9200;
    proxy_read_timeout    90;
    proxy_connect_timeout 90;
    proxy_set_header      Host $host;
    proxy_set_header      X-Real-IP $remote_addr;
    proxy_set_header      X-Forwarded-For $proxy_add_x_forwarded_for;
    proxy_set_header      Proxy "";
  }
}
The following example query does not verify the offered host certificate. In case you configure the ElasticWriter feature in Icinga 2 v2.8, you’ll find the options to specify certificates for TLS handshake verification.
$ curl -v -k -u icinga:icinga https://192.168.33.7:9200
* Rebuilt URL to: https://192.168.33.7:9200/
*   Trying 192.168.33.7...
* TCP_NODELAY set
* Connected to 192.168.33.7 (192.168.33.7) port 9200 (#0)
* WARNING: disabling hostname validation also disables SNI.
* TLS 1.2 connection using TLS_ECDHE_RSA_WITH_AES_128_GCM_SHA256
* Server certificate: icinga2-elastic
* Server auth using Basic with user 'icinga'
> GET / HTTP/1.1
> Host: 192.168.33.7:9200
> Authorization: Basic aWNpbmdhOmljaW5nYQ==
> User-Agent: curl/7.54.0
> Accept: */*
>
< HTTP/1.1 200 OK
< Server: nginx/1.12.1
< Date: Tue, 12 Sep 2017 13:52:31 GMT
< Content-Type: application/json; charset=UTF-8
< Content-Length: 340
< Connection: keep-alive
<
{
  "name" : "icinga2-elastic-elastic-es",
  "cluster_name" : "elastic",
  "cluster_uuid" : "axUBwxpFSpeFBmVRD6tTiw",
  "version" : {
    "number" : "5.5.2",
    "build_hash" : "b2f0c09",
    "build_date" : "2017-08-14T12:33:14.154Z",
    "build_snapshot" : false,
    "lucene_version" : "6.6.0"
  },
  "tagline" : "You Know, for Search"
}
* Connection #0 to host 192.168.33.7 left intact
Conclusion

Since we’ve used the Icinga Vagrant boxes as a development playground, I’ve added Nginx as HTTP Proxy inside the icinga2x-elastic box. This provisions the required basic auth and TLS settings and offers to write data on https://192.168.33.7:9200 (icinga/icinga). The same applies for Kibana. The examples above can be replayed too.
If you want to learn more on this topic, make sure to join our Elastic Stack training sessions or kindly invite one of our consultants for a hands-on workshop. Hint: There is an Elastic Stack workshop at OSMC too 🙂


0 Kommentare
Trackbacks/Pingbacks